Warning: Undefined array key "keywords_en" in /mnt/web218/a3/28/510129628/htdocs/main.php on line 234 Warning: Undefined array key "description_en" in /mnt/web218/a3/28/510129628/htdocs/main.php on line 235 Warning: Undefined array key "commercials" in /mnt/web218/a3/28/510129628/htdocs/main.php on line 261 Tutorial 13

Tutorial 13

GL (very) Basic Tutorial

aka "so, you want to write a game, do you?"
© 2008 PeeJay

Lesson 13 - Getting the heads up!

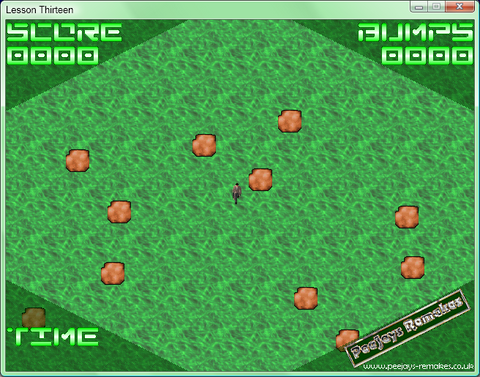
This is a bonus lesson provided only to show you how the game could be easily improved upon - the actual game itself hasn't changed, but it is merely improved presentation now. I have included a HUD (head up display) on the game - this will mean I can implement a scoring method, and also introduce you to a function I have used in practically every game I have written (and that you are more than welcome to use too) designed for displaying bitmap fonts.
But what on earth is a bitmap font? Well, the internal commands in GL Basic for drawing text on the screen do tend to be fairly uninspiring. If we used graphics instead, we could have our text in any format we want, as interesting as we want. So, with this in mind, we draw a font in a graphics program (or using some of the excellent tools that are available to simplify the task) and use this to draw on the screen.
As for the actual HUD, since I didn't anticipate having one from the start, whereby I would have had my character slightly off centre in the screen to allow space for the information (thus he would still appear centrally in the actual game area) then I'm going to use a bit of poetic license, and chop off the corners to use them for the HUD area.
I'm actually going to use 3 seperate counters for the game (which could be a scoring method) - those being score (for the number of enemy you manage to shoot), bruises (for the number of times you get hit) and timestarted (the exact time you started to play the game.) There will be quite a few new commands and concepts in this lesson, so I hope you've got your thinking caps on!
So, off we go - first off let's look at the graphics. There are 2 new graphics - these are corners.bmp and font.bmp, both of which we will be loading in as animated images. Although they are not animated as such, hopefully by now you will be comfortable with the fact you can load in one image that contains multiple "views".
Let's have a think about the order to draw things on the screen. If we print the corners first, then they will be overwritten by the background. If we do it before the enemies, then they will appear over the corners, similarly with the bullets. So, we need to draw the corners last .... well, nearly, anyway. Since we are going to add player information on these corners, then this will need to be drawn after the corners. This all sounds very simple, but it is one of the mystic arts of programming - doing things in the right order.
Now, to keep things easy to follow, I have added a new function - DrawHUD. Looking in the DrawScreen function, you will see I am calling this just before the back buffers is revealed, thus bringing everthing into view.
Right, before we look at the new function, let's go back to the section that is declaring the global variables - there are three new ones there. The first 2 are fairly self explanatory - score and bruises. The third one, however, needs a little more explanation, namely timestarted. Using GETTIMERALL() we can set this to the length of time the game has been started. Then, if we want to know how long the player has been playing, we simply subtract the start time from the current time. This will be in milliseconds, however, so, in order to convert that to seconds, we will also need to divide this figure by 1000. Simple, eh?
Obviously we need to update these variables, but the one storing the start time we will leave untouched until we actually want to do the calculation, as it will remain unchanged while playing the game. With this in mind, if you look in the CheckForShotEnemy function, you will now see that if the enemy does get shot, we are adding 1 to the score. In a similar fashion, the IsPlayerHit function now has a line that increments the number of bruises.
Okay, lets get this information on the screen, then. Look at the DrawHUD function. Firstly, we are drawing the four corners on the screen - remember to subtract the image height and width away from the actual screen size and width to place them in the correct location.
Now for a really clever bit - can you remember when I first introduced functions, I mentioned it was possible to pass information to them? Well, we are going to do just that in this lesson! We call the function DrawText, and pass the information "SCORE",0 and 0 to it - we will look at this function in depth shortly. For the time being, just think that the DrawText function does exactly that - it draws that text on the screen at the 2 locations given, using the font bitmap file we have loaded.
Now for the confusing bit - adding leading zeroes to the score. Let me show you how it is done.
	LOCAL t$="000"+score
Okay, so we are setting up a local variable holding "000" and tagging the score on the end. This means, for scores from 0 to 9, it will have 3 leading zeroes and be 4 characters long. Perfect. Oh, but what happens when the score goes from 10 to 99? We still have 3 leading zeroes, but we now have 5 characters in the string, and we want to limit it to four!
	t$=MID$(t$,LEN(t$)-4,4)
We have 2 new commands here on one line - MID$ and LEN - so lets look at what each one does.
LEN is short for LENgth, and returns the length of a character string.
MID$ is used to take a section of characters from a string, using the format:
MID$(string name$,character to start from, length)
So, for our problem, since the LEN(t$) is now 5, we want to start from the second character in (the first character is in position 0, the second in position 1). By putting zeroes at the start of the string, we get the effect of drawing leading zeroes on the score, so, for example, if your current score is 123, then "000"+score would make "000123", but by truncating this to 4 characters by removing excess from the left, the result is "0123" - neat eh?
Now we do exactly the same for bruises, but we draw the text "BUMPS" on the screen - this is only because the word "BRUISES" would take up too much space and not fit in the HUD design. Again, we pass the variable bruises to the function, and precede it with leading zeroes.
Next we do the same for "TIME". But we need to work out how long the player has actually been playing for - luckily this is easy. If we set up another variable, time, and referring back to how I mentioned how the figure could be calculated, you can see how easy it really is in practice. So again, we can draw this.
And that's it - all our information is on the screen, so we can end the function (so it jumps back into the DrawScreen function) ready to show the back buffer. I'm sure you can appreciate how useful the DrawText function has been, and it has appeared in nearly everything I have written in one format or another, so I had better explain what it does and how it works. To demonstrate precisely what is going on, I'm going to refer back to the first time we called the function with this:-
DrawText("SCORE",0,0)
so we can see precisely what it is doing.
Firstly, we are passing variables to the function, and storing them in txt$, tx and ty
	FOR loop=0 TO LEN(txt$)-1
Now we are going to take each character in turn, from 0 to the length of the string minus 1 (since the first character is 0)
	cr=ASC(MID$(txt$,loop,1))-32
and using the MID$ command, we will extract that individual character. The ASC command returns the ASCII code, but 32 is space, which is the first printable character, so we subtract that from the result.
That may seem confusing, so let me explain. Computers store numbers - if you are writing a letter, it is stored as a series of numbers. If you are drawing a pretty picture, it is also stored as numbers (as we introduced with the Red,Green,Blue format of picking a colour.) Everything a computer does is converted into numbers for it to work with.
So what? Well, a long time ago, some clever Americans came up a system that they called the American Standardised Code for Information Interchange (shortened to ASCII - pronounced ask-ee), and this has stuck with us until the present day. The idea was simple - to devise a method that computers would use that means a particular number always corresponds to the same letter, no matter what computer is was running on. So, in ASCII, value 32 is space, 65 is capital "A" - and this will be the same on every computer.
What we are doing is turning the character back into it's ASCII code, and this can be used to display the correct character in our animated image. Neat, huh?
	DRAWANIM 5,cr,tx,ty
So now we will draw the right frame of the animated image on the screen
	tx=tx+32
and move the x pointer ready to draw the next character in the string (the font is 32 pixels wide.) And now we can move on to the next character.
Once all the characters in txt$ have been processed, then the loop will end and we can terminate the function, then return to where we left off.
If you managed to work your way through everything so far, then hopefully you'll start to have enough confidence to write something for yourself by now. If you struggled during the description of that last function, don't worry, as it is quite complicated to get to grips with as a complete novice. If you're still totally baffled, though, consider starting the tutorials all over again, as they may well make more sense the second time through.
http://www.glbasic.com/files/tutorial/ImgLesson13.png
Finally, if this has inspired you to write something, and it ends up being a huge blockbuster hit, and you make squillions of pennies, remember who started it all off :o)
Download the Source Code and Media Files
Previous Lession
Get More on the Forums