aka "so, you want to write a game, do you?"
© 2008 PeeJay
© 2008 PeeJay
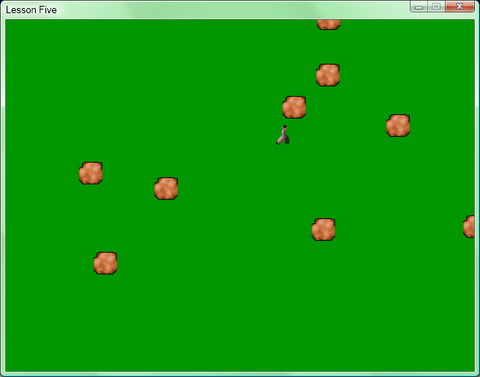
LOADANIM "enemy.bmp",1,32,32We are loading out enemy graphics into memory, in this case a brown rock. We will only be using the first image of this strip in this lesson - the rest are for a later lesson. Note, the SETTRANSPARENCY is still the same - RGB(0,0,0) won't be drawn.
TYPE enemy
	enx
	eny
	difx
	dify
	status
ENDTYPE
GLOBAL enemies[] AS enemy
Now for the tricky one - types. This command is used for grouping together groups of similar objects, and being able to add numerous variables to each of them. It is a very difficult command to actually explain - it is better just to see it in action. I will explain, in this instance, what each of the fields are used to hold - enx and eny are holding the enemy position, difx and dify are holding the amount to move in each direction, and status will, in a future lesson, hold the status of the enemy, and ultimately, which graphic in the imagestrip to use. Each enemy we create is then going to be stored in an array, enemies[] for us to reference.
IF RND(20)=20 THEN AddEnemy()Every loop of the game, we will pick a "random" number between 0 and 20. If it is 20, we will go to the AddEnemy function. So, on average, for every 20 loops, we will add one enemy.
UpdateEnemy()Every loop of the game we will want to update any enemies, so this will call that function. Now, lets have a look at the addenemy function.
LOCAL temp=RND(1)We pick another random number - 0 to 1, just to establish whether to start the enemies from the right of the screen or the left.
IF temp=0
	LOCAL en AS enemy
		en.enx=640
		en.eny=RND(480+32)-32
		en.difx=-2-RND(4)
		IF py<en.eny
			en.dify=0-RND(3)
		ELSE
			en.dify=RND(3)
		ENDIF
		en.status=0
	DIMPUSH enemies[],en
ENDIF
Wow, there's a lot to take in at once - but it's not as difficult as it first looks. If the random number we picked was 0 then we will add an enemy on the right of the screen, moving left - let's take it one line at a time:
If temp=0Check to see whether the random number chosen was 0
LOCAL en AS enemyIf it was, let's make a new enemy. That's how easy it is to make a new enemy - GL has automatically allocated memory to hold the information, and will, be default, set all the fields to 0. So now we want to set the fields to what we want.
en.enx=640
en.eny=RND(480+32)-32
Set the enemies x position to the right hand side of the screen, and the y position to a random position between the top and the bottom.
en.difx=-2-RND(4)We want the enemy to move from right to left, but we'll have different speeds they can move at - in this case, a random speed, from 2 to 6 pixels at a time.
IF py<en.eny
	en.dify=0-RND(3)
ELSE
	en.dify=RND(3)
ENDIF
Remember before we used IF .... ENDIF? Now we're throwing another idea in, namely IF ..... ELSE ..... ENDIF. What is this doing? Well, we are comparing the player vertical position on the screen with the enemies position, and adjusting the enemies y direction to move towards the player (or no vertical motion).
en.status=0This really doesn't need adding - like I said, Blitz defaults all the fields to 0 - but it is here for completeness.
DIMPUSH enemies[],enNow we want to add our newly formed enemy into the enemies[] array.
ENDIFOkay, so we have finished the decision of whether the random chosen number was 0. Now we do the same again if the chosen number was 1 - except this time the enemy starts on the left and moves to the right. That might have been quite a bit to take in, so why not sit back for a moment and take a couple of deep breaths? Types can seem confusing at first, but once you get used to them, you'll wonder how anyone ever managed to do things without them! Right, are you back? Great! So, onto the UpdateEnemy function - now you'll see the real power of types!
	FOREACH en IN enemies[]
		en.enx=en.enx+en.difx
		en.eny=en.eny+en.dify
		IF en.enx<-32 OR en.enx>640 OR en.eny<-32 OR en.eny>480 THEN DELETE en
	NEXT
Wow - that wasn't too bad to update the screen position of hundreds of enemies at once, was it? This takes each enemy one by one, and updates the x and y positions of them. It then checks to see whether it has gone off the boundaries of the screen - if so, it removes them, as they are no longer needed, and we don't want them clogging up the memory! Isn't that easy? So now we will use the same principal when we draw the screen:-
	FOREACH en IN enemies[]
		DRAWANIM 1,en.status,en.enx,en.eny
	NEXT
So, we draw each enemy at the appropriate enx,eny co-ordinates, and use status image in the strip (in this case, image 0 each time.) If you look back, you will see that when we load the rock graphic, we assign the number 1 to it (0 is assigned to the player.) Try running it and seeing what it does. Aren't types brilliant? Once you get to grips with using them, you'll be amazed just how many things you can control with just a few lines of code.